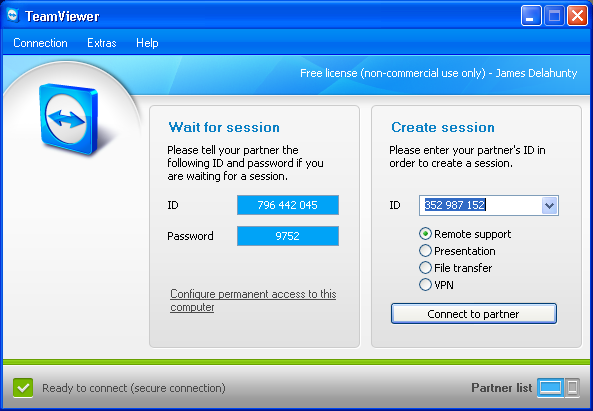

Run TeamViewer. It will look something like the image above, only your I.D. and password
will be different. You need to ask the person at the remote computer,
or somehow retrieve the I.D. and random password that TeamViewer assigns
to it. You need that I.D. and password of a remote machine to connect
to it (you don't need the I.P. address).
When you have the correct I.D. and password, type the I.D. into the ID field under "Create Session" as shown in the picture above. Make sure Remote Support is selected and click Connect to Partner.
When you have the correct I.D. and password, type the I.D. into the ID field under "Create Session" as shown in the picture above. Make sure Remote Support is selected and click Connect to Partner.
Password Prompt

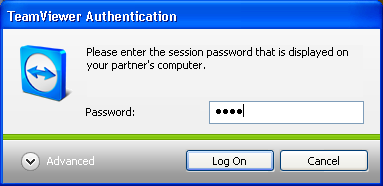
You will now to prompted to enter the password for the remote machine.
This is usually a 4 digit number that is randomly generated between
sessions and between instances of TeamViewer running

Remote Desktop - First Look

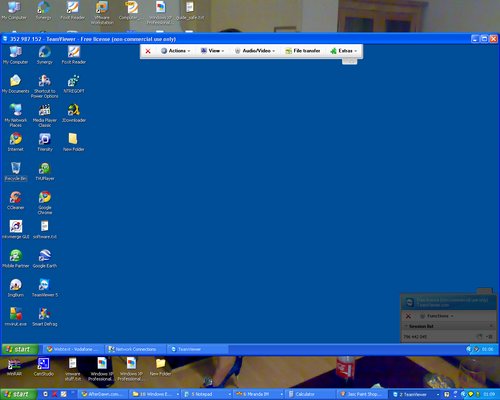
The picture shown above (click to enlarge if needed) shows the Remote Desktop
on display. The remote desktop is from a laptop with a widescreen,
which explains how it is displayed in the center of my screen, but we
can change those settings later if required.
Take note of the menu bar on the top of the Remote Desktop window. You have a red X to close the session at any time, Actions menu, View menu, Audio/Video menu, File Transfer button and Extras menu. Over the rest of this guide we will go through these options and see what they can do for us.
NOTE: How responsive the remote desktop will be largely depends on how good the connection is between both. Both Internet connections (for each computer) count when it comes to connection quality. There are a few settings we can change that can help with either speed or quality, but there is no substitute for a decent connection. Additionally, if there was CPU and RAM intensive tasks running on either computer (particularly the remote computer which is capturing and broadcasting its Desktop), that will also have a negative effect on performance.
In the Actions menu there are some interesting Options
to look at. Most of these options to have to do with controlling the
remote machine or the user in front of the remote machine.
- Switch sides with partner: This option will literally turn the tables. Your Desktop will be streamed to the remote computer instead and the person at the remote computer (if any) could control your computer.
- CTRL + ALT + DEL: Sends the CTRL + ALT + DEL command to the remote computer (since pressing these keys yourself will bring up Task Manager or whatever is defined on your local machine).
- Remote reboot: If you need to Log Off the remote User Account or reboot it these are options for that.
- Send key combinations: Allows you to send keyboard combinations to the remote machine.
- Disable remote input: A user at the remote computer is able to do anything they like on the Desktop, but you can stop them by selecting this option
- Show black screen: Will show a black screen on the remote computer to give you some privacy. For this to be selectable you have to have Disable remote input selected too.


No comments:
Post a Comment